Saturday, December 17, 2011

Fresh Picked Beauty: All-Natural Peppermint Kissed Lip Tint

Fresh Picked Beauty: All-Natural Peppermint Kissed Lip Tint


This recipe for All Natural Peppermint lip tint is shared by my sister Janine Washle.  You can visit her website for more interesting ideas and gift suggestions.
www.cloverfields-ky.com

Tuesday, December 13, 2011

Handmade Cinnamon Broken Glass Christmas Candy

I enjoy watching the Cupcake and Cake wars on Food Network.  I find it fascinating when the chefs make their own candy and spin them into fabulous designs.  I may not be able to craft a candy cane, or fantastic flowers or spinning fairies with candy wings, but I can make some delicious cinnamon candy.  I got the recipe off a friend and co-worker who called it Rock Candy.  He would bring bags of it around Christmas and we would all go crazy for it.  He wrote the recipe on a torn piece of paper, that is much stained from years of use.  I suppose I'll print off a new one after I blog it to you all.

I do have some warnings to go with this candy, I learned the hard way.

Warning 1: Try as hard as you can not to have your face or any other body parts close to the hot sugar when you add the cinnamon oil.  A facial is nice, but having pure cinnamon oil infused into your open pores is miserable. It's much worse if it goes up your nose, much worse.  Trust me, I tried to stay away from it tonight and a little got on my face.  My cheek is a little hot, and my hand is red and tingling a bit.  I smell very nicely of cinnamon though.

Warning 2: Try to use a very deep pot, or make sure you have on a shirt you don't mind to ruin with the food color.  Once you drop the food coloring into the hot sugar, it will start sputtering and erupt like a volcano of red dye.


NOTES:
The past few years I used a wooden spoon and was so disappointed that my candy didn't have a nice cinnamon, well honestly, any cinnamon taste to it. This year I used a stainless steel spoon, and  my candy is so nice and Cinnamon flavored.


Ok, with the warnings out of the way, lets move on to the good part.  Making candy!  YUMMY.


Rock Candy or Broken Glass Candy

3 3/4 cup sugar
1 1/2 cup white corn syrup
1 cup water
1 small bottle of Cinnamon oil (find in Pharmacy or bulk food store)
Red Food Coloring
Candy thermometer
Sheet pan with sides
aluminum foil (optional)
butter/oil
Powdered sugar

Have the sheet pan prepared before you start boiling the sugar, also have the cinnamon oil bottle opened and close by as well as the bottle of food coloring.  Things move quickly once hard crack stage is reached, be prepared.

Mix sugar, corn syrup and water and bring to a boil
Stir constantly until thermometer reaches 300-310 degrees
Remove from heat
Immediately stir in cinnamon and food coloring
Pour into sheet pan that has been oiled (or place a piece of aluminum foil on sheet pan and butter it)
Let cool
Once cool take the handle of a butter knife, or case knife and crack the candy into pieces
Place in a bowl or zip lock baggy and Roll in powdered sugar


This recipe is very versatile, you can use any sort of flavored oil you like.  Peppermint, wintergreen, anise....likewise, you can use any color food coloring you like as well.

If you are making a Gingerbread house, you can pour the candy into pre-made little molds to make the window glass and "glue" it in with royal icing.  Place a light inside the house (single corded lights can be found at craft shops all around.  They have one socket for a Christmas light bulb) and you've made a magical gingerbread house for Christmas.

You can also form foil into a circle and pour the candy into it to make a lovely pond for skaters to skate upon in front of your gingerbread house or Christmas village.  Simply tint the candy blue instead of red, once cool dust lightly with powdered sugar to look like snow covered ice.  My Mom always did those things when she made our Gingerbread houses. She really is creative.


Friday, December 2, 2011

Dance of the Sugar Plum candies!!

Often I've heard the song, "Twas the Night Before Christmas", with the lyrics;

"The children were nestled
All safe in their beds
While visions of sugarplums
Danced in their heads"


I love that old song, it always creates an image of Christmas magic with elves, candy, stars and Santa dancing in the dreams of sleeping children. I've often wondered what a sugar plum was and how delicious it must be, if the children dream of them the night before Christmas.
Children love cartoons, and I have not grown out of that love myself.  I do enjoy cartoons, and don't mind the least that my child wants to watch them all the time.  One of my favorite cartoons is "Max and Ruby", a story of a little boy bunny and his perfectionist sister.  In one episode, Ruby and her friend Louise are giving a "Dance of the Sugar Plum Fairies", ballet recital to Grandma and Max.  The refreshments include, you guessed it, sugar plums.  I was kind of disappointed to see that they were sugar coated plums.  What a bummer.
One day, while shopping in Whole Foods (my favorite grocery store ever), I saw a display of Christmas treats.  I noticed a box of sugar plums.  Now the moment of truth.  I turned the box around to read the ingredients, to my pleasant surprise, it was not a box of sugar coated plums.  Score.  I purchased them and went to the car to see if the sugar plums held up to the Christmas song hype.  They did and then some.  Now, I wasn't going to spend a ton of money buying these sugar plums, so I would have to learn to make them.  I searched the web for a recipe that was similar to the ones I had finally found.  There were many recipes, but the one I am posting, with a few minor changes, is the one that included all the ingredients I really liked.  
 
The base recipe is by Treva Bedinghaus, About.com Guide.
http://dance.about.com/od/famousballets/r/Sugar_Plums.htm?p=1

I added a couple things which I will include under the original ingredients, and italicized. 

Ingredients:

2 cups whole almonds
1/4 cup honey
2 tsp. grated orange zest
1 1/2 tsp. ground cinnamon
1/2 tsp. ground allspice
1/2 tsp. freshly grated nutmeg
1 cup finely chopped dried apricots
1 cup finely chopped pitted dates
1 cup confectioners' sugar
1/2 tsp. grated ginger
1/2 tsp. ground cardamon
1 bag semi-sweet chocolates
Whole cloves

Preparation:

Preheat oven to 400. Arrange almonds on a baking sheet in a single layer and toast in oven for 10 minutes. Set aside to cool, then finely chop.
Meanwhile, combine honey, orange zest, cinnamon, allspice, and nutmeg (ginger, cardamon) in a medium mixing bowl.  Add almonds, apricots and dates and mix well.
Pinch off rounded teaspoon size pieces of mixture and roll into the shape of a plum and add a clove to the top as the stem.  (Rinse hands often, as mixture is very sticky.) Roll in sugar, then refrigerate in single layers between sheets of waxed paper in airtight containers for up to 1 month.  Their flavor improves after ripening for several days.

I actually rubbed my hands with a little butter and that helped keep the mixture from sticking.  Before I formed the sugar plums, I used a double boiler and melted the bag of semi-sweet chocolates.  Then as I formed the mixture into balls, I dropped in the melted chocolate and covered them.  I dropped the chocolate coated balls onto a lined cookie sheet and my little boy took a spoon and sprinkled (dumped....whichever you choose) colored sugar on the chocolate (purple would be ideal).  I didn't use the confectioners sugar. 
A few notes for those who can learn from my mistakes.  I, mistakenly, thought I could take a cup of dried apricots and when they were finely chopped by the food processor, that it would still be one cup. duh, not so.  As my Mom told me, it will vary, best is to finely chop and measure appropriately.  Same with the dates.  If I had chopped the dried fruits first, thereby getting the correct amount added to the mixture, it would have tasted better.  Don't get me wrong, they taste good, but a little too much nut flavor for my taste. 
My Mom also had a great idea, take a pitted prune (dried plum) and use a melon baller and scoop out the middle, then stuff the sugar plum mixture into the prune shell and THEN dip in chocolate.  Too much detail work for me.  I like short and sweet recipes, not complications....but, for those of you who don't mind I think it's a great idea.  Let me know how it turns out!!!


More lyrics: http://www.lyricsmode.com/lyrics/c/christmas_songs/#share

Sunday, November 27, 2011

I have always loved bananas. They are so good for you and they taste delicious. I especially love fried bananas with a fried egg, or banana bread on a cold snowy day with hot chocolate.  Alas, I can no longer enjoy a banana.  Several years ago, I noticed an itchy sensation in my throat when I ate bananas.  My tongue felt thick and tingled, an overall unpleasant experience.  I brought it up to my doctor who informed me it was a food allergy.  I had, to date, never had any kind of allergy to food.  How could this be?  He advised me that some people acquire food allergies as they get older.  He was right, that was the start of several food allergies.  Hopefully, I have stopped developing food allergies, it really is difficult to deal with at times.  When we go to restaurants I have to go down the list of food I am allergic to.  If we are in a seafood restaurant, I have to specify that they cook my food on a clean grill, or in a clean skillet and it can't be touched by anything that has touched seafood, shellfish, spinach, etc.  I was recently in a seafood restaurant and they advised me that they only had a small grill and could not guarantee that anything they grill for me would not be contaminated by an allergen.  My husband really wanted to eat there, so I ordered something that was "safe", how badly could nachos get messed up?  Extremely badly as it turns out.  I took one bite and tasted shrimp.  Shrimp is one of my more severe allergies.  I asked the waiter to come over to tell him that the chips tasted of shrimp.  His answer not only shocked me, but caused great concern at the ignorance of a person who serves food to patrons who may have food allergies.  He nodded his head as I told him my discovery and advised me that they, do, fry the chips in the shrimp oil.  He also helpfully added, that the heat of the oil kills all the allergens in the shrimp and renders the food completely safe for those of us who are allergic.  Wow.  Sadly, this is the attitude of many wait staff.  They are not educated, the cooks are not educated, and food allergies are not taken seriously.  People die every day from anaphylactic shock brought on by food allergies.  Restaurants really need to take those extra steps to insure the safety of their food served to the public. Some people have such severe allergies that even the smell of a food they are allergic to can send them into a severe health emergency.  Thankfully, none of my allergies are so extreme.
My husband and son love bananas, we have them in the house but I don't cook with them as the steam from the cooking bananas can cause a mild irritation to my throat.  We also don't eat several other things because I can not cook them, due to my allergies.  My mother-in-law came for a visit and she made some banana nut muffins.  We had several left over bananas that I did not want to waste, after she left.  I decided to bake some Banana Bread.  My Dad sent over the recipe they use and I tried my very first Banana Bread.  It smelled really good, and yes, it did  cause me a little discomfort, I just took an antihistamine which seemed to ease the symptoms some.
Sometimes having food allergies makes me sad.  My Mom and I have taken several cruises and most of the time the food on the menu has some sort of allergen.  The wait staff are very good about making sure the food is safe.  It's important to tell them prior to your sail date of allergies and then to discuss with both the Maitre dee and your waiter, your allergies.  They are, however, unable to change the menu.  After several nights of eating a small variety of things, I was so upset to discover that there was nothing on the third nights menu that I could eat.  I broke down in tears and left the dining room.  The waiter followed me out to the elevator to ask what was wrong.  I told him that there was nothing on the menu I could eat.  He was so nice, he offered to get me a hot dog from the Lido deck.  I laughed and motioned to the evening gown I had on and said no thank you.  He coaxed me back to the table and made it his mission to bring me a grilled chicken breast with other things I could eat.  Of course, his kindness and concern again had me in tears, but that is what should happen.  None of us asked to have food allergies, it's annoying to the people who go out with us, it's annoying to the waiters and chefs/cooks, it's annoying to us.  The fact is, people have food allergies.  They are dangerous, and they can kill.
That said, please try this wonderful recipe, unless you are allergic of course .  The Banana Bread came out of the oven and between my son and husband was devoured shortly thereafter.  This recipe is for muffins, however the bread recipe is at the bottom.  I don't like nuts in my food, as a general rule.  So I left the pecans out.  

Banana-Nut Muffins:
author: unknown


1 3/4 cups all-purpose flour
2 1/2 teaspoons baking powder
1/2 teaspoon salt
1/2 cup sugar
1 large egg, lightly beaten
1 cup mashed ripe banana
1/2 cup milk
1/3 cup vegetable oil
1/2 cup chopped pecans


  • Combine first 4 ingredients in a large bowl' make a well in center of mixture.  Combine egg, mashed banana, milk and oil; add mixture to dry ingredients, stirring just until moistened.  Stir in pecans.
  • Spoon batter into greased muffin pans, filling three-fourths full.  Bake at 400 degrees for 18-20 minutes or until golden.  Remove from pans immediately.  Yield: 1 dozen
  • Per muffin: Calories 217 Fat 10.6g Cholesterol 20 mg Sodium 184 mg
Banana-Nut Bread:
Spoon batter into a greased 81/2 X 41/2 inch loaf pan.  Bake at 350 degrees for 1 hour or until a wooden pick inserted in center comes out clean.  Cool in pan 10 minutes.  Yield: 1 loaf.


Wednesday, November 9, 2011

Caprese Bread or Tomato Basil Bread


Thanksgiving is around the corner and I want to make something different this year.  I made pies for Thanksgiving up until a year or so ago; we nicknamed them "drop pies", because I managed to drop everyone of them before I got them into my Dad's house.  I'm very glad that I always had a lid on the pies, which is what saved them from being total disasters.  Of course they looked terrible, but they still tasted good.  I'm over the whole pie making thing.  What's new and different?  I am on a quest to find something that will knock my family’s socks off.  

During October I purchased a magazine called, "Taste of Home", I found so many neat and delicious recipes.  I really enjoyed the Halloween Edition.  I decided I would purchase one of the Christmas Editions.  I purchased the Edition titled, “Best Holiday Recipes 2011".  It is chalk full of delicious recipes, I am going to try several of them. 
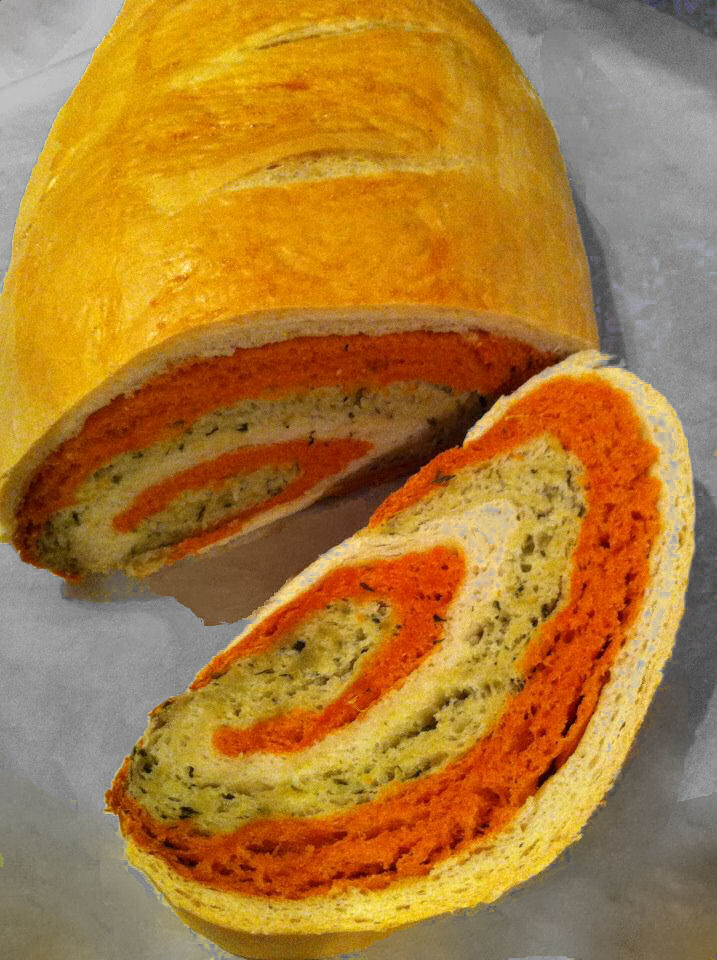
 I found one recipe in particular that I could not wait to try.  As I posted in my last blog, I am enjoying learning to bake bread, so naturally it is a bread recipe.  The recipe I found looks beautiful and sound divine, except for one thing.  I'm allergic to one of the ingredients.  If I made this recipe I would have to modify it and how would I do so since I'm new to the whole bread making world.  I understand the yeast is tricky, there can't be too much flour or too little flour, the ingredients have to be exact and room temperature or the yeast won't rise, careful not to over-mix. What was I going to do? One word, try.  So I did try, and I'm glad that I did.  The bread is so good, the recipe made two large loaves, allowing me to share with my family, friends and the Chef at our favorite restaurant.  I had to leave Chef Ricks with one of the waitresses, who complimented me on the beauty and festive look of the bread.  A deft poke with her finger and she exclaimed how soft the bread is too, and smelled wonderfully. I hoped the bread made it to Chef Rick's office, intact.  So far, everyone has raved about the bread. So what is this fabulous recipe?  Drum roll please.....

"Tomato Spinach Bread" by Avanell Hewitt 
Featured on page 71 of the "Taste of Home Best Holiday Recipes 2011"

Instead of using Spinach, which I am allergic to, I substituted Basil so the bread I made is Tomato Basil Bread, or Caprese Bread.  One of my most favorite salads in the world is the Caprese Salad.  Its taste cannot be beaten.  It is also so simple and easy to make, the flavors just go together.  Tomato, Basil, Mozzarella sprinkled with Olive oil.  Fantastic.  I was hoping this bread would be a wonderful compliment to the salad, it did not disappoint. 

This is the modified recipe:

Tomato Basil Bread or Caprese Bread

Yield: 2 loaves (10 slices each)

Bread (plain) Dough:

1 package (1/4 ounce) active dry yeast
1 cup warm water (110 - 115 degrees)
4 teaspoons butter, melted
1 teaspoon salt
2 3/4 to 3 cups bread flour

Basil Dough:

1/4 cup cold water
6 ounces of Basil paste (found in cold veggie section)
1 package (1/4 ounce) active dry yeast
3/4 cup warm water (110-115 degrees)
4 teaspoons butter, melted
1 teaspoon salt
3 1/4 to 3 1/2 cups bread flour

Tomato Dough:

1/4 cup cold water
6 ounces of tomato paste
1 package (1/4 ounce) active dry yeast
3/4 cup warm water (110-115 degrees)
4 teaspoons butter, melted
1 teaspoon salt
3 1/4 to 3 1/2 cups bread flour

1 egg white
1 teaspoon cold water
Parchment paper

For plain dough, in a large bowl, dissolve yeast in warm water.
Add butter, salt and 2 cups flour; beat until smooth.  Add enough remaining flour to form a firm dough.

Turn on to a lightly floured surface; knead until smooth and elastic, about 6-8 minutes.  Place in a greased bowl, turning once to grease top.  Cover with a wet towel.  Allow to rise 2 hours.

For basil dough, in a large bowl, dissolve yeast in warm water.
Add butter, salt and 2 cups flour, and basil paste; beat until smooth.  Add enough remaining flour to form firm dough.

Turn on to a lightly floured surface; knead until smooth and elastic, about 6-8 minutes.  Place in a greased bowl, turning once to grease top.  Cover with a wet towel.  Allow to rise 2 hours.

For tomato dough, in a large bowl, dissolve yeast in warm water.
Add butter, salt and 2 cups flour, and tomato paste; beat until smooth.  Add enough remaining flour to form firm dough.

Turn on to a lightly floured surface; knead until smooth and elastic, about 6-8 minutes.  Place in a greased bowl, turning once to grease top.  Cover with a wet towel.  Allow to rise 2 hours.

Punch down each dough and divide in half; cover.
On a lightly floured surface, roll out on e portion of each dough into a 10in X 8 in rectangle.  Place a rectangle of basil dough on top of the rectangle for plain dough, and then place the rectangle for tomato dough on top of the basil dough.  You'll have 3 layer dough.  Roll into a 12in X 10in rectangle.  Roll up, jelly roll style, starting with a long side, pinch seams to seal and tuck ends under.  

Place seam side down on baking sheet lined with parchment paper
Repeat with remaining dough.
Cover and let rise in a warm place until doubled, about 30 minutes.

With a sharp knife, make three shallow diagonal slashes across the top of each loaf.
Beat egg white and cold water; brush over loaves.
Bake at 350 degrees for 35-45 minutes or until golden brown.  Remove to wire racks to cool.

The original recipe:
         For the spinach dough:  same as basil dough except substitute basil for 1 package (10 ounces) frozen chopped spinach, thawed and squeezed dry.  
        for all of the dough:  Instead of letting it rise for 2 hours on the counter, the original recipe calls for it to be covered and placed in the refrigerator overnight. 

This bread is delicious with spaghetti, toasted with butter and mozzarella melted on top.  There are many ways to enjoy this bread.  Share some of your ideas with me; I'd love to hear them.


Monday, November 7, 2011

German Broetchen or German Hard Rolls


My Mom is German, as I've said before, and she brought a bag of German Hard Rolls home one day when I was little.  She was very happy she found them at our local grocery store.  I remember looking at them, thinking they didn't look that special.  I poked one, sure enough hard as a brick,  I thought Mom was crazy.  Why in the world would anyone want to eat a roll with a crust like that.  Surely it would break your teeth out.  Was I ever wrong.  Crusty on the outside, soft and delicious on the inside.  A true breakfast treat.  I never thought I would bake them myself.  I'm trying to branch out my kitchen skills.  I am finding that I do love to bake bread.  Good for my family, bad for my figure.

 These were so much fun to bake, even more fun to eat. 

 You will need two days to make this recipe so make sure you plan your time accordingly.

This recipe was e-mailed to me, so I do not know to whom credit should be given.  Whomever you are, thank you, simply delicious!


Ingredients:

Note: you will need a spray bottle with water for this recipe.  This is what makes the crust crunchy.

Day 1: 
2 cups Bread Flour
1 1/3 cup water
1/2 tsp instant yeast

Day 2: 
5 1/2 cup bread flour
1 1/3 cup water (extra if needed)
1 tsp instant yeast
1 to 1 1/2 tsp salt

Preparation: 
 Day 1:
 Mix all the ingredients, for Day 1,  in a bowl until smooth and lump free
Cover loosely with plastic wrap
Leave on counter overnight (this makes the "sponge")

Day 2:
Mix the sponge with 5 cups of flour, water and yeast
Knead for 8 minutes, preferably with a stand mixer
Add up to another half cup of flour until dough barely sticks to the bowl
Sprinkle salt over the dough and mix for 4 minutes
The dough should be smooth but still tacky, adjust with water,  a teaspoon at a time,  or flour, a tablespoon at a time
Form dough into a ball and place in an oiled bowl turning once to coat
Place a damp towel or plastic wrap over the top and let the dough rest for 2 hours
Turn dough out on lightly floured work surface and cut into pieces the size of a small orange
Let dough rest for a few minutes then form into small balls or any other shape you like
Coat in flour and place on parchment paper about 2 inches apart
Cover with a damp cloth and let them rise for another hour
Preheat oven to 450 degrees
Place an old pan on the bottom rack
Lightly score  rolls with a serrated knife or blade
Place rolls on cookie sheet and place  in the oven on the next shelf above the pan
Pour 1 cup water into the old baking pan and close the door quickly
Spray sides of the oven with water 2 or 3 times in the first 5 minutes of baking
Bake for 15 to 20 minutes
Cool rolls on wire rack so that the bottom will not get soggy

Rolls should be eaten warm and crispy

Place in the fridge then re-crisp in the oven or toaster if you are not eating them the same day

They can even be frozen

I didn't have a spray bottle so I used a basting brush and a cup of water to splash on the sides of the oven, it worked nicely.

Thursday, October 27, 2011

Go Nuts (or Ape) for my Chocolaty Pumpkin Monkey Bread

Go Ape for my chocolaty pumpkin Monkey Bread

I had Monkey bread many years ago and it was so good.  A while ago I tried to replicate it, but failed miserably.  I ended up with a pile of dry bread covered in burned cinnamon.  Yuck!  I learned from that mistake and went on to discover the most delicious combination of monkey bread ingredients I ever tasted.

Ingredients:

2 cans biscuit dough
1 cup cinnamon sugar
Nutella Hazelnut spread
Pumpkin Pie dip
5 pats of unsalted butter

1 bread pan greased and set aside

Tear biscuit dough into small chunks and place into a large bowl as you tear them apart.
After all your dough is in small chunks pour cinnamon sugar over them and toss until every piece is coated in the mixture
Drop coated bread chunks into greased bread pan
Do not overlap, make one layer
Drizzle Nutella over this layer and then the pumpkin pie dip
Make another layer of dough, drizzle again with Nutella and Pumpkin pie dip
Make last layer of dough and place pats of butter on top
Place in oven and bake until dough is done, according to directions on biscuit dough can
WATCH carefully dough may bake faster, depending how big or small the dough pieces are.
Don't over bake!

Serve warm with scrambled eggs.  It is so good!

You can find Pumpkin Pie dip in most specialty kitchen stores.